Monday, June 24, 2013

Rocky Road to Kansas, and a Table Topper to be won

Here is my Blue Rocky Road to Kansas - 10 blocks of 30 needed.  Each block finishes at 12 inches.  I've put bits of dark red and limey green to keep it bright.  Will I EVER use up my BLUE scraps?  This is the second quilt I've made using this design - the other one (below) used mostly authentic thirties scraps and is hand quilted.  

(Below) - these are NOT my blue scraps - these scraps belong to my Quilt Guild.  I offered the skills of my local quilting friends to make the 2013 Serendipity (Raffle) quilt to be awarded in July.  This smaller table topper incentive is for ... not sure on this - it goes to the one who sold the most tickets, or to whose name is pulled from "the hat".  

This started as 9 blocks, then one brilliant person suggested we make it a table topper, and let's redesign the corners to turn it into an octagon - GREAT idea.  Then when I was trying to balance the blocks and colors, and exchanged places with some of the blocks, look what appeared --- a friendship star in the middle!  What a lovely surprise!   Then I added a narrow red strip and another blue strip, log cabin style.  I am leaning towards reducing the width of the last blue strip - not sure yet.  Sydney quilted the center block using her long-arm machine skills and I will machine quilt (DSM) the rest of it, following her style in the center.  For now, I'm not planning on using a traditional binding, maybe turning the front into the backing.  I'd love to win this myself.

This is our version of Lady of the Lake, one name of many similar.

Sunday, June 16, 2013

Rocky Road to Kansas, and Orphan Blocks


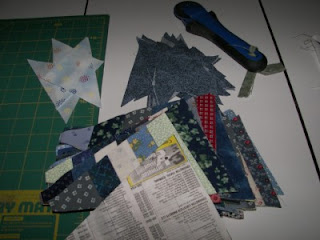
I'm playing with strings, sewing them down to phone book pages.  This is going to be Rocky Road to Kansas, inspired by Eleanor Burns, Egg Money Quilts.  This particular pattern has 2 cardstock templates which are provided in her book. Thanks Eleanor!  I've made it before and it turned out great.

First, I rough cut the phone book pages to wedge size, then sewed on all the strings.  There is no measuring, so this part goes FAST.  I already had strings, and used most of my 1 1/2 in. pieces, but added wider and narrower for interest, mostly in the blue range.

I drew around the wedge template on the back of the string units, then trimmed with rotary cutter.  The center pieces start as squares, cut in half, sewed on the widest part of the wedge, and trimmed.  They are consistent for the entire project.

This will be 30, 12 inch blocks, 5 x 6, and I'll probably add a border.

I sewed the 4 wedges together, with that triangle attached and ended up with a star thingy, points flapping in the breeze.  (I forgot to photo the white template piece used for the 4 sides, provided as well.)  I marked with pencil the center of that white triangle/pivot point and pinned it to the inside pivot point of the star, started sewing at the outside star point to that pivot point, needle down, and wrangled it around (used a stiletto) and sewed down the other side to the next point.  One would not think it would work but it DID! I bit of pressing and voila!  After the first one, I discovered I should remove the paper from that pivot point for a sharper pivot.  First one is OK.  8-))  NO puckers!


Below are several 6 inch orphan blocks made into potholders.  I used one layer of cotton batting, then one layer of Insulbrite.  I found that turning them was not neat and tidy for my first ones (had forgotten how to do this simple task - note the flying geese points all caught in the thick seams!).  Then I remembered how to do it better!  Add a small sashing so the points wouldn't get lost, and for the backing. put a seam in the middle of the backing, but leave a few inches for turning.  For me, it's impossible to turn that item neatly leaving a side seam open, but if you sew a seam in the backing, and leave a few inches for turning, sew all 4 sides, it turns so much neater, then simply hand stitch the backing seam closed.  I machine quilted a few seams to finish it off.  I don't hang my potholders, so no tab.  AND no fussy binding. 

Thursday, June 06, 2013

Jamestown Landing (My Way)

The center of my Jamestown Landing is all quilted here.  I want to find another name for this project - something about remembering Mom and Grandma telling me about their extraordinary methods they tried to make a little pocket change during the Great Depression - all during this quilt construction, I heard Mom over my shoulder, reminding me to "Make do".  I wish she was here to see it now -- Mom never knew me as a quilter unfortunately.

If you have not seen this quilt previously, I used plain blue fabric instead of the suggested strings, inspired by Bonnie Hunter of Quiltville.

(The hanging flower basket was given to me by Sydney, after I had mailed her a quilt that had her name written all over it, a quilt called "RED".  )


 Below is a close up of my favorite quilting design that works well as an overall design, and that fits well with the space on my DSM.


 Also, a favorite free-form design for an inner border.  I like to finish my designs with a circular spiral, just for fun? 


A final version, all the chunks of fabric on the wide border are quilted in a variety of designs - most I like, some, not so much, but they are good practice and good examples. Binding is done as well.  I LOVE those beautiful shadows!!


Sunday, June 02, 2013

Home Improvements

This past week was the beginning of a major home improvement - this was our back yard and the alley behind, below was our front yard.  Remember how hot is was last summer? - so hot that I actually MOVED my sewing and much of my existance downstairs to the basement.  Our old A.C. unit was inadequate for that extraordinary heat.  Additionally, our old behemoth of a furnace that was over 50 years old, wile still functioning, it had definitely seen better days, and was terribly inefficient, compared to new models.  We bit the bullet and "called the man".   (Should I say his mother is a quilter?) 

We were shocked at the cost of upgrading our electrical service -- double to our guesstimate.   That job was done the previous week with 3 guys.  All this work was accompanied lots of noise, hammering, ladders, up and down on the roof, in and out of the house, up and down stairs, Building Inspection, but was eventually ready for installation of the HVAC system.

Removing the old furnace equipment from the house was an astonishing production.  I was shocked at the amount of old junky, dirty stuff that came out of the furnace room.  The old firebox itself must have weighed over 500 lbs - that was scarey to know that monstrosity had been working as well as it did!  There were 5-6 young guys in and out of our house for most of 4 days - I lost track of trips in and out.  They had put down plastic over the carpet, and took as much care as possible - they were the best -- polite, courteous, hard-working, skilled, professional and considerate.  I wish I had a dollar for every trip up or down stairs!  Yikes, such energy.  They also were in and out, up and down, in the ceiling putting in new "runs", making things, taking apart things, dumping old stuff, unpacking new stuff, pounding, coming and going, sawing holes in the carpet/floor for new registers!  So much activity wore us both out - we had to miss our naps for 4 DAYS!

Some of stuff coming IN - only a fraction of the total!  (I liked the poppies in the background!)

Ahhhh, the new A.C. condenser!  Happy Day!
Of course, all is computer-everything!  A person can't just "fix" things any more!  The digital inside thermostat is another computer - can be connected to a smart phone, if I get  a modem.  I could actually be far from home and adjust the home thermostat digitally so the house is warmed to the right temp when I walk in the door.  Oh Good Grief!!!

All this work was done in 4 days.  Since installation, we've had some cool weather - the furnace works great!  Now we're waiting for hot weather, to see how the A.C. works.  8-)))  Naturally, we had to "play" with the computer thermostat!  It's a relief to know this big job is done, and done well. Funny thing - when we bought the house 15 years ago, this was going to be the first improvement!  LOL

Oh yes, one more good thing - there was so much activity, we couldn't waste time watching the danged news on the TV, so DH finished HIS boat project and I finished MY quilt project!  That will be another post!