Monday, March 26, 2012

Lesson Learned, after the Fact - Piping and Miters

Here's the entire top, finished.

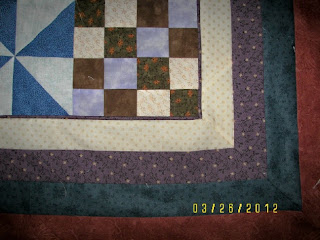
...and here are photos of 2 of the problem corners, where I needed patience getting a nice inner corner.  I learned my lesson.  Next time I will add the piping to the quilt TOP and criss-cross the corners, possibly pulling out a bit of the cording.  But I was stubborn and didn't know, and sewed the Piping to the border strip.  Since those stripes really HAD to be mitered. I caused myself complications with the piping.  

Despite the problems, they turned out not-too-badly!  The piping kinda turned into itself -- I'm not re-doing it. 

Now I know better.  Thanks to all you helpers out there, who remembered their garment sewing days.   


Sunday, March 25, 2012

My Current Problem Child, Mitering Piping on Border

Is there a better way?  This is close, and it will probably quilt out, but I spent waaaay to much time on getting this piping mitered.  I never have "regular" mitering issues, but that piping kept getting in the way.  This piping is sewn to the border strip, not the quilt top.
  1. Perhaps I just wasn't neat enough? 
  2. Should I remove some of the cording out of the piping in the last 3/4 inch? 
  3. Or, should I have sewn the piping on the quilt top, and NOT the border strips?  ... sigh ... I will next time ... but in the meantime ...
I am a terrible "I'll do-it-myself" person (stubborn, I know) and should have sought help before struggling for more than an hour on just one miter. 

Saturday, March 24, 2012

Piping - Use the right foot

Today I re-learned lessons I KNEW when I was 20 but haven't used in ...uhhhh a long time.  I am adding a line of piping between my quilt and the border -- it needed just a teeny bit of something.  My friend Jody (Goddess) gave me some tips, and indeed it is not hard, but takes time, but the end result is so snazzy! Thanks Jody.  (BTW, I call her "Goddess" because she's so danged good at so many things!)  8-))

First thing, get the RIGHT foot!!  I was told my zipper foot would work - NOT!  My zipper foot is flat on the bottom, by design, whereas the piping foot is rounded underneath.  The right foot makes all the difference in the world.  ($10.99).  Sewing is almost done by itself -- I just had to fold the fabric over the piping.  There are 2 rounded grooves - I haven't figured out what the right one is for.  My machine is a Janome 6500. 
Here is my pile of cording and piping, all sewn together.  I cut my fabric strips at 1 1/4 in., and for this use, straight of grain.  This process goes easily. 

Now, I am trimming it.  My LQS had the neatest gadget/ruler for trimming where the piping slips into the groove in the ruler and then you can easily trim, protecting your fingers from the blade, but I passed that up and used my bias bar.  Kinda dangerous, but it did the job - not nearly as well, but it's done.

Here is the border with the attached piping, on top of the quilt, ready for sewing.  I learned this from a Ricky Tims DVD -- see the crease to the left of the thread?  Use your fingernail on your right hand (I was holding the camera with my right hand) to make a crease very close to the piping.  Somehow that crease gives you another bit of space to sew closer, so no (dark) threads show when you are finished.

The entire side was nearly perfect, with only a few inches in one place that needed a tighter resewing.  Like many new projects, it was easier than I thought!  This is my present Pinwheels and 4-Patches. 

Ta dahhhh!


Thursday, March 15, 2012

A Surprise Visitor

DH called me at work and asked me to come home - he said we had a visitor.  Huh???  We weren't expecting anyone but he was adamant.  Home is only 3 1/2 blocks from my office and it was time to leave work anyway, so I checked my hair, lipstick, washed my hands and headed home, driving first by the front of our house to see whose car was there -- uhhh -- no car.  No car around the back of the house either. 

Here is our visitor!  A very small owl - and he's just looking back at us, occasionally clacking his beak in threats, not at all moving except for his eyes.  He's about 8 inches tall.  Hey, what's that in the upper right?  Yes, a SECOND little owl -- which surprised DH as well - he had missed the 2nd one completely.  We think they are Screech Owls.  They were not at all disturbed by our presence -- less than 6 ft. from their perch.    Feathers match the tree trunk so perfectly, the owls almost disappear.  While we were watching, one made the softest quivering, purring sound,


I've never seen one here, but occasionally in the fall, when sitting outside at dusk, we see a shadow of something swoop by - we know it's owls, but never actually see them. 

It's comforting to know there is still some wildlife in my little back yard.

Sunday, March 11, 2012

Pinwheels and 4-Patches, My Second!

This is the second "Pinwheels and 4-Patches" quilt  WIP.  It is simple, simple!!!  I LOVE those graphics!  These are my favorite colors (I call them "foresty") and I DO have a lot of them.  Blocks are 6 inch, finished.  These are bits and pieces in boxes under the bed, under the sewing table, in drawers, stacked in a corner, in plastic carryalls, etc.  I actually started this almost 3 years ago at a Retreat.  My colors are not arranged correctly - that's another project.  Inspiration was from http://www.quiltville.com/, and a Better Homes and Gardens book, and from another book, somewhere around here.   They all had good ideas, color suggestions, layout.

In this layout, every other row of pinwheels changes direction, and also every other row of the 4-patches rotates 90 degrees.  One row starts with a dark square of the 4-patch in the upper left corner,  but the next row it's a light square of the 4-patch.  I've seen this one done without the same layout of the 4-patches, and the design is just fine, but not the same.   The light corner of the 4-patch nestles up next to a light pinwheel part of adjoining blocks, and the dark corner of the 4-patch nestles into the dark portion of the adjoining pinwheel.  (It's easier to SEW them correctly than it is to write this correctly!)  8-)

Here is my previous version -- the one on our bed, in daily use.

See? it looks similar!  The above quilt is trimmed in green and browns.  This newer one will be trimmed in purple or blues, possibly, and will be smaller.  No idea about border yet.
The one above? I struggled with leaving those bright blue/turquoise pinwheels in the quilt, but THEY are the ones that give it some emergy.  (another one of those lessons!)

Sunday, March 04, 2012

BOM, Greek Cross

This cute block is our Guild BOM, Greek Cross, for March - EASY.  I am visualizing those corners from other members' blocks, and how they will result in pretty quarter square triangles where all the corners meet.  As usual, one "ordinary" block will be gorgeous, when we see all of them together.  This one is so much prettier than I thought it would be!  Hope I win!

I've also been watching the Eagles and their eggs at http://www.ustream.tv-decoraheagles/, the link that Lynn of Nebraska Views kindly sent me after she read my post about driving to see the eagles at Kingsley Dam.  Watching them via the eagle cam is so much better than anything!  Watch out, it's addictive!  I really enjoyed watching the mouse who thought he'd like to investigate the nest, but almost met his death when one of the parents swooped from nowhere and almost caught him!  The cam changes views, and the last time I looked she had 3 eggs.  I had no idea how fascinating all these animal cams could be! 

I'm still here, but working on the Guild Serendipity (Raffle) Quilt.  The binding was finished this morning, and I have one small problem to correct. Unfortunately, I can't show it yet -- not until the "big reveal" in June. 

However,  I HAVE learned a valuable lesson about sewing on piping with a zipper foot (what I had) vs. a piping foot (didn't have)!  After much aggravation with my zipper foot (square shaped underneath) vs. the piping foot (rounded shaped underneath), I was happy to fork over my $10.00 for the piping foot -- Dad always said, "Use the best tools!"