Showing posts with label Jewel Box. Show all posts

Thursday, July 24, 2014

Making Quilt Barn Blocks

I was "empty" in ideas for a friend's birthday, but then ... a lightning bolt hit me and I remembered her conversations about tours in her area featuring Quilt Barn Blocks!  Eureka - I can make one for her birthday!  BTW, this is the same friend who yesterday, received the Raffle quilt!  I had started this idea before she won that quilt.  

No, it's not perfect, but  I'm LOVING it!

Months ago, I painted 4 quilt blocks on the garage (Lady of the Lake) and I smile each time I see it, but it's painted on the siding, not on a separate board.  Painting on siding has issues!

The local lumber store cut my exterior grade plywood -- I had to buy a 24 in. square.  I needed a 16 inch square.  First, a little sanding, then primered front and back with regular oil-based house paint (used what I had from deck work).

I wanted a simple design that would have some color at the corners, and eventually decided on a simple Buckeye Beauty or Jewel Box -- this is the beginning.  The periwinkle blue (already had) was left over from my own block on the garage.  Because she is not a quilter, I wanted her to see how putting 4 blocks together made a new design.  These colors are water-based.

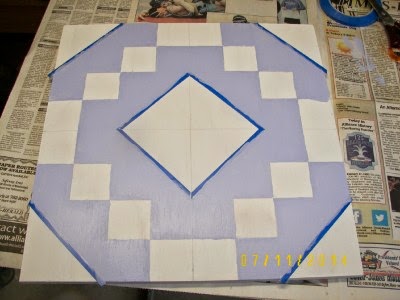
There is a lot of taping, letting dry, more taping.  Next time I do this, I'll try another plan but for now, here it is.  The greens and blues needed several coats, but they dried quickly.
 It's looking almost finished ... I used some steel wool to take off the glossy look.
mmm - needs something -- yessss -- it needs quilting stitches!  Yeah - looks better now!  You MUST have stitches!!!  (Sharpie)

DH helped by cutting the framing strips, also sanded, primered and painted.  He was so funny - these guys - at first when I mentioned this idea, he thought I was bonkers.  One step at a time and next thing I knew, he was wanting to help!
I bought some screw eyes and found a wire and voila - DONE!   I signed it in a corner, boxed it up and mailed.  It went from western Nebraska to Chicago area in 2 days.

SHE LOVED IT!  We were on SKYPE when she opened it.  I had told her that SHE had given me the hints, but she never could guess what was coming.  8-)))

Tuesday, December 10, 2013

Blue Eggs, and a Jewel Box AKA Buckeye Beauty WIP

It's been almost a MONTH!!! since I posted anything - Where have I been?  However, the weather has been beastly cold - down to -28 below zero at the airport, and several other mornings at -18.  We had a 10 inch snowfall, fortunately light and fluffy, and had to do the snowblowing thing, a demand that took us both several days to recover from.  ( I know, that's a dangling preposition!)  We did the snow blowing and the temp was still BELOW zero.  Some kind unknown persons with a tractor plowed  the entire block sidewalks - what a generous gift to all of us.  We are most grateful!  It's been a week since it snowed, then the extreme cold kept us all inside, and today was the first day I actually ventured anyplace in the car. 

Last Saturday, having some ham left from Thanksgiving, I decided to make a REAL breakfast.  DH brought home eggs from the Barber Shop and I opened the carton to this lovely surprise. 

 All lovely shades of (neutral?) brown but the blue ones were just plain lovely.  I've never seen them before and had to Google "Blue Eggs".  Todays lesson!  

The Araucana, also known in the USA as a South American Rumpless,[1] is a breed of chicken originating in Chile. The Araucana is often confused with other fowl, especially the Ameraucana and Easter Egger chickens, but has several unusual characteristics which distinguish it. They lay blue eggs, have feather tufts near their ears, green legs and yellow undersides to their feet. Conversely, the Ameraucana has blue-slate to black legs and either black or white on the undersides of the feet.  Araucana hen showing ear tufts.jpg

Below is a current project on my "Design Floor" - yes, another scrappy quilt.  I kept the HSTs all in browns, deep reds and a few greens.  I kept the rest of the palette somewhat consistent, with a few brights for "twinkle."  The lights really needed to be scrappy for a bit of contrast (IMHO).  This should be 10 x 11 blocks and the blocks are 6 inch finished.  I was smart this time and make ALL the 4-patches, and ALL the HSTs and kept track of them with a tally sheet. in baggies, then started sewing them together. It's a small suggestion, but often I don't count ( duh) which is definitely a waste of time.  I make 10 blocks at a time, then get up and do something else.  Sewing definitely goes faster if one does not need to stop and cut more, a little at a time. This block has so many possibilities.  If you are consistent in sewing the same way each time,  I found if I twirled all the seams in the back, (pressed all clockwise) each block's seams will nest in the next block with no problem seams - a good time saver. 


Monday, October 15, 2012

Good Binding Gadget, and "Jody Blue" Finished

  I LIKE these little binding clips.  They are easy to use, if you drop them, you can FIND them, and no more sticking myself with pins.  They hold the binding well.  (My binding is always the same size - a cut strip 2 1/4 inch, folded.  If you use really narrow or really wide binding, I don't know if they would work. )  I remove them as needed and clip or unclip them to my shirt or cuff - no reaching for the pin cushion.  There are 10 in the package - that's enough.

Below I'm getting ready to sandwich Jody Blue, on one of the last days of summer, in the garage.   Jody gave me many of the blue scraps, and it's almost exactly like a recent copy, RED, finished about May.
Here it is, DONE.  I LOVE the tree shadows. and I also LOVE the perky reds and some lavendars from  my stash.  The large dark HSTs that make up into a square? - I had originally planned them to be one/same color, but they ended up looking like BLOBs, so I made them scrappy as well. 

I also used chunks for the border - supposedly I'm using up scraps.  Yeah, right!  The quilting in each of the border chunks are of various designs - some look great, some less desireable, but the quilt is a a good sample item.  My binding is a dull red. 

Below is the back - again, trying to use up what I have - I LIKE it.  Despite carefully measuring, I ended up with narrow bits of fabric on each side of the backing - exactly what I thought I would avoid!  Jeeeeesh, Elaine, focus!  But the squares at the top and bottom ended up straight and half-blocks - no slivers.  I enjoy using 10 inch squares of fabric, but on the back, a person has to be careful to keep it all straight and true - like using stripes, you must keep it straight, or it looks amateurish.
 A little closer shot on the fence.  IMHO, the reds, and creams and brighter blues give it twinkle and depth.

(Below) I am starting to think more about "modern quilts" and really like this kind of straight line quilting.  It's easy and good for filling large areas. 

I quilt on my DSM, a Janome MC6500 - it NEVER fails me.


Sunday, October 07, 2012

Retirement Laziness

I have been retired for one month and feel like I've turned into Ms. Lazy Butt.  My inner clock must be "off", I am awake in the middle of the night, remain unfocused, undriven, lazy, impatient, etc.  This new chapter is going to take some getting used to.  If you have suggestions, I would welcome advice on how to "settle in." 

My Retirement Reception was absolutely wonderful, more than I could have imagined, with many well-wishes, expressions of love and respect, many gifts and cards - including a LOT of gift cards to my LQS, two beautiful cakes - one with a quilty design, and a lot of folks saying really lovely things about me.  I was hoping DH was listening closely!  LOL

Above is a Diana Phalen signed painting that used to hang in my office, and which was given to me for keeps.  I don't have the best place for it yet, but it certainly looks good with that quilt, doesn't it?   

Below is a corner of MY quilt that looks a lot like another one I did, called "RED," and a lot like one from a German lady that I've recently shown.  This one is  called "Jody Blue."  My quilting friend Jody visited me weeks ago, and behind her back she hid a giganto bag of blue scraps. She said she was totally TIRED of making blue quilts, and I was gifted what was left (which was considerable!).  So a gal just HAS to make a blue quilt, doesn't she?  There are bits of lavendar and red, from 4-patches I already had.  The border is chunks of parts.  The blocks are 6 inches, and this quilt measures about 67" x 74".  If you haven't seen "RED", they are almost twins. These blocks are Jewel Box, or Buckeye Beauty and are no more than 4 patches and HSTs.  This is an easy quilt, and setting possibilities are plentiful.  


The colors are more lively, in person.
 I made so many errors with this simple quilt, I KNOW I'm not concentrating.  Jeeesh!  Embarrassing!!! 

For the backing I opted to use what I already had from stash , and made a bunch of 10 1/2 inch squares.  This is a stack of about 100.  I will need 80 for the back of "Jody Blue."   I'll show that backing another day.

We have a warm day coming up so I'm hoping to baste it soon, outside in the garage.

100 ten and one half inch squares, more lively in person.

Below is a new book, recently out, by Judy Woodworth.  She is a member of our Guild and an amazing long-arm machine quilter.  Her long list of long-arm machine quilting awards is incredible.  Many of her quilts are made with her friend Mary Sue Suit, also a quilt book author and member of our Guild, and some of Judy's assistance is provided by her talented husband. Judy does complex and intricate machine quilting, and has the most amazing "spirit"!  She's a quiet little woman, with a gigantic talent.  This is her second book and this one is about designing your OWN patterns and motifs.  If you want to expand on your machine quilting (especially long-arm) this is an excellent resource.   (The lack of color on this photo is totally MY fault!)


Sunday, July 01, 2012

RED, Owls, Friendship Stars

RED is done, washed, blocked, and folded and put away.  I'm pleased with how it turned out.  For the last scrappy border, I quilted a separate design in each chunk - for interest and practice.  Some of the designs are not good for entire quilts but I still like to use them, here and there -- good practice for me.  Some worked well, some not so great - oh well.  It gives the viewer something to look closer at (whoops, dangling preposition ...)  The triangles were kept in one consistent configuration.

For the record, this pattern is called Jewel Box, Buckeye Beauty, Blue Ridge Beauty and a few more.  It is among the easiest designs, can be used in a great variety of ways, producing remarkabley different end product.  Even now, I'm thinking it would be wonderful in blue!  It's about 65" x 75".


For Lori, in South Dakota, who asked about what fabrics I used.  I can't say I used anything specific, but do notice most of the reds are small scale, and the lights are creams and whites, some with bits of color in them.  This truly was scrappy - I didn't buy anything for the top.  A couple of the reds do NOT "go" but again, they are what gives the quilt character.


 And, once again, here is one of the screech owls.  I happened to be under one of them when it "erped" up a pellet.  Yes, I was the lucky victim.  We were fearful that the neighborhood fireworks would scare them off, but nope, they are still here.  (It seems that Kodak does not "fix" owl red eye - must be something about their eyes different than human eyes.  LOL) 

Here are some friendship stars our local quilt group is making for a quilt for RSVP, Retired Senior Volunteer Program.  The small bit of fabric in upper right is our focus fabric.  It was GREAT for a focus fabric but no longer looks good as a border.  I think we are making 120, 6 inch blocks, all scrappy. 

Friday, June 08, 2012

RED, top nearly completed


I'm adding the border today - these pieces are only laid down - some of them need  adjustment in length.  I had planned another similar border, but it was getting too large.  This one will be about 63 x 75.  Blocks are 6 inch finished, first light border finishes as 1.5, triangles finish at 3, and last border finishes at 3.  If you are new to triangles for a border, be sure you plan the layout first before sewing them - sometimes those little rascals trick you!

For those of you who struggle with color choices, what fabrics?, will this match,? is that too light?, etc. The only fabric that I had questions about, was a pinky/yellow-y Valentine heart-type fabric and you guessed it, it's the piece that gives the quilt punch and interest.  So, LESSON # 846, don't fuss and fiddle and overthink your fabric choices --  pick a pallette and then JUST GOOOO FOR IT!   IMHO, this quilt BEGS to be scrappy!!!  You simply need lights and darks.

All fabric was from stash.  8-)  This is sometimes called Jewel Box, or Buckeye Beauty, Quiltville has one called Blue Ridge Beauty.  This is a VERY versatile block, so simple, yet design options are endless!  I've used it for a great border.

Tuesday, May 29, 2012

Seeing RED!

My stash of RED scraps is getting out of control.  (Yeah, what's new about that!).  This Judy Martin quilt, Country Cousins, has been tugging at me for YEARS!  Then a few days ago, I received this Land's End catalog of all these red and purple and pink and orangey bathing suits.  I'm not purchasing bathing suits but this ad was the catalyst to start somthing RED. 

I kept it simple, decided against, Judy Martin's design, and started Buckeye Beauty or Jewel Box.  Bonnie Hunter also has a similar design.  What fun!  Making this one is fairly FAST!  Here are 56 blocks - for now, I'm aiming for 110.  The block is 6 in. finished.  I need a total of 240 4-Patches, and 240 HSTs.  I'm halfway there! 

Here are my strips of red and light, pressed and laid out on my cutting mat.  I still have issues with cutting accurately, with eyestrain and accuracy, so I purchased a June Tailor Shape Cut ruler.  It has slots at every 1 inch and half inch.  This works VERY well for me.  Each cut strip remains precisely the same size, and I'm not straining my eyes.  I've showed the ruler before - it's one of my favorite tools.  It's a bit flimsy, so  I store it on it's side between furniture cabinets, along with big square rulers.  This was under $30.00 at JoAnns and I used my 40% coupon.  I've VERY happy with this gadget.  An entire mat full of carefully laid out strips can be cut in just a minute or two.  Press down firmly on the ruler and nothing moves.  One must be careful to cut at the right slots - it's easy to get carried away and miss your mark!  I used my Olfa cutter - not all cutters work.

Here it is with the ruler laying on top of the strips, ready to cut!  You slip your cutter into the slots along the edge of the ruler. This would be PERFECT for a variety of blocks, especially when you have hundreds of cuts to make.  I haven't tried it on anything but strips yet.