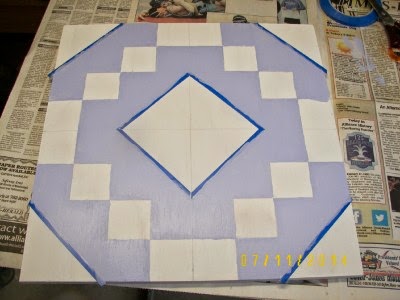
I was "empty" in ideas for a friend's birthday, but then ... a lightning bolt hit me and I remembered her conversations about tours in her area featuring Quilt Barn Blocks! Eureka - I can make one for her birthday! BTW, this is the same friend who yesterday, received the Raffle quilt! I had started this idea before she won that quilt.
No, it's not perfect, but I'm LOVING it!
Months ago, I painted 4 quilt blocks on the garage (Lady of the Lake) and I smile each time I see it, but it's painted on the siding, not on a separate board. Painting on siding has issues!
The local lumber store cut my exterior grade plywood -- I had to buy a 24 in. square. I needed a 16 inch square. First, a little sanding, then primered front and back with regular oil-based house paint (used what I had from deck work).
I wanted a simple design that would have some color at the corners, and eventually decided on a simple Buckeye Beauty or Jewel Box -- this is the beginning. The periwinkle blue (already had) was left over from my own block on the garage. Because she is not a quilter, I wanted her to see how putting 4 blocks together made a new design. These colors are water-based.
There is a lot of taping, letting dry, more taping. Next time I do this, I'll try another plan but for now, here it is. The greens and blues needed several coats, but they dried quickly.
It's looking almost finished ... I used some steel wool to take off the glossy look.
mmm - needs something -- yessss -- it needs quilting stitches! Yeah - looks better now! You MUST have stitches!!! (Sharpie)
DH helped by cutting the framing strips, also sanded, primered and painted. He was so funny - these guys - at first when I mentioned this idea, he thought I was bonkers. One step at a time and next thing I knew, he was wanting to help!
I bought some screw eyes and found a wire and voila - DONE! I signed it in a corner, boxed it up and mailed. It went from western Nebraska to Chicago area in 2 days.
SHE LOVED IT! We were on SKYPE when she opened it. I had told her that SHE had given me the hints, but she never could guess what was coming. 8-)))

I am a quilter - a retired widow living in the Nebraska Panhandle. I am surrounded by beautiful semi-arid ranch country, and treeless hills and fields under incredibly wide blue skies, located far from the upheaval found often in large towns or cities. I am blessed to have delicious time to quilt and to appreciate my peaceful moments in an unpeaceful world.


It looks great! I love that finished edge that the framing strips give it, but the little stitches were pure genius!
ReplyDeleteoh, Elaine, it's just gorgeous ! Aren't you clever? Kathleen
ReplyDeleteWhat a blessing you are ... to your friends and to those of us who read about your grand ideas!
ReplyDeleteHow great is this. Colors are fabulous. My birthday is I. March, hint, hint!
ReplyDeleteIn March. Dumb keyboard!
ReplyDeleteLove it Elaine! What a great gift! I may have to gift one to myself! :)
ReplyDeleteWhat a wonderful gift! It involved quite a bit of work, but was well worth it. I wonder if I could get DH to make me one. He is the painter in the family. It would be neat to put on the shed in the back yard of our new home that we will move into Aug. 4!
ReplyDeleteYou're a good friend. I enjoy your posts.
ReplyDeleteLove it and love your idea of adding the "stitches"! What a great gift!
ReplyDeleteI loved the process photos, now I could make one if I wanted. Neat!
ReplyDelete