Showing posts with label wood model boat. Show all posts

Friday, December 30, 2011

Machine Quilting, and the Other Side of the Studio

While waiting for the next step in a Quiltville.com Mystery Quilt, I pulled out this  "Rebuilt Log Cabin," my name for the design, and I started the machine quilting.  I call it "Steps" for a variety of personal reasons.   I had dreaded the quilting, as I KNEW there were several pleats in the backing, but planned to quilt TO that area and then rebaste, a job I was NOT looking forward to - ugh!.  Happy Day - I lost track of where I was stitching, and dang it if I didn't quilt those pleats right into the backing and honestly, you can hardly tell they are there unless the viewer KNOWS it, and other than all you bloggers, I'm not telling!  Am I lucky or am I lucky?  8-)))

My husband works on the other side of our "studio" which is only a small room about 10 x 11 feet.  If he rolls his chair back when I roll my chair back, we crash, that's how small our space is, but we still manage to do our things. 

He makes wood, model boats and frankly, between quilts and boats, we are running out of space.  This project is USS Constitution, "Old Ironsides", circa 1700, a war ship and this is a crosswise  cross section.  The mast goes up another 2 levels, but he decided this was tall enough.  DH is a big man, large hands and I truly do NOT know know he can fiddle with all the lines, tiny knots, drilling teeny things, etc.  In this case, he cannot even rest his hand on anything when his hands have to be 18 inches over the tablle.  There are a LOT of words that come out of his mouth at times -- then I have to leave the area!  Those clamps are helping to hold knots tight, or glue or something.  This is a cross wise section, and his detail is amazing!  There are several decks on this ship, which would hold all the supplies for the crew.  This one starts as a kit, with the basics, and instructions are frequently in another language and almost always, have serious errors, so all calculations and cutting have to be logically challenged - you just cannot dump the parts out on the table - you have to KNOW how boats/ships are built. He's really good at adding or inventing the details that bring it to life, as well as "making do" when something goes awry.


Below is a close-up. So far, he's put in 150 hours, and there are many more to go.
 

Tuesday, July 12, 2011

On the Other Side of the Studio

DH and I share a small "Studio." If we both pull our chairs back at the same time, we bump. He gets threads in his boats, I get wood shavings in my quilts. We get over it.

This is one of the latest boats my DH builds. This style of boat is called a "Pink" -- don't remember why, but one unusual characteristic is that the bow looks a lot like the stern. (The stern is on the left in the photo.) We didn't include sails on this one - kinda glad as that ends up my job. He puts several hundred hours building each boat. They are as close to accurate as he can fathom, and I know he's IN that boat, running around, checking to see that all is shipshape. Many of the decking parts are removable so one can see down inside the hull, which he's also designed as accurately  as he knows.
This is my favorite detail on the boat, below. See that round hole on the stern, over the rudder? Just guess what that is for! Whew - what a ride that could be!!! So much for privacy!

Tuesday, March 15, 2011

Salmon Trawler, Incognito?, and Rulers


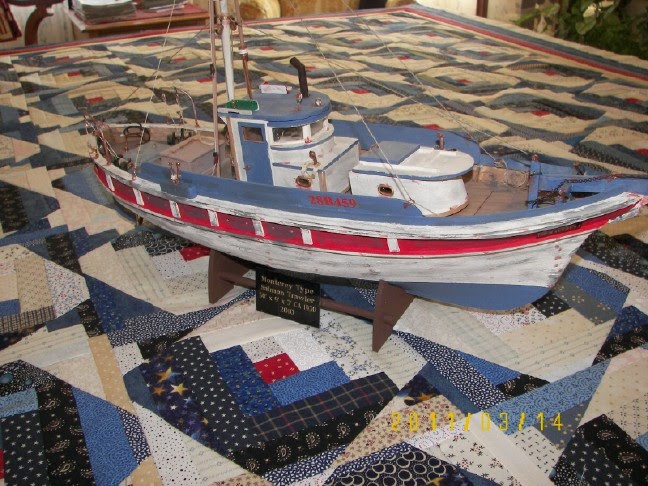
I took my husband's boat down to dust the shelf and had no where to put it except on my basting table. Uhhh - hey, where did it go???

This is how he describes this boat.

34 ft, "Courageous" named for xxxxxx, with health struggles, patterned after the Bud Galli Book, The Little Boat that Could. Monterey type salmon trawler, San Francisco, Fisherman's Wharf. Circa 1908 to 1934. 30' x 9' x 3', 7 ton, 10 hp Hicks engine, scale 5/8" = 1'-0" Billings model, modified, 126 hours, 6 glues, 2010.

When planning my recent Log Cabin variation, I decided to give the June Tailor ruler, Shape Cut, a try. Holy Smoke - for Log Cabins, or any kind of strips, if you have a table large enough, this ruler is better than sliced bread! I've always had issues keeping my strips the right size. This eliminates THAT issue, because you are holding down the entire piece of fabric with the ruler and there is NO slippage. This tool totally eliminated my eye strain. Even if you have excellent vision, I DO recommend this tool if you cut all your fabric at one time. I DO think it's cumbersome for cutting bits and pieces at a time. The slots are for your rotary cutter. I am using Olfa rotary cutters - my Dritz does not work. I used a coupon and I think it was about $25.00. It's large enough so you can fold your fabric twice (4 layers). The slots are at the half inch. You can zip through cutting so quickly, it's easy to get carried away - be careful with your math. Again, check your rotary cutter to see if it fits.


The smaller ruler, "Quarter Cut" (below) remains unused -- perhaps someone can give me hints as to the best way to use it. It has quarter inch markings, which sounded like a good thing at the time, but it's not large enough to cut WOFabric. Maybe it would be more useful if you just cut SOME pieces at a time. ??