Showing posts with label Log Cabin. Show all posts

Sunday, January 08, 2023

I'm still here!


* This QOV was donated, as well as 2 kids quilts 
* I made a LOT of zip pouches until zipper stash was depleted.  
* Made a pleasant drive (2 days) by myself to Indiana to surprise my sister who was making a rest stop in Indiana, on her way from Canada to Florida.  She WAS surprised and due to my weight loss and new, long never-previously-seen curly hair, she didn't reognize me!  It's been a long time since we last had seen each other. 
* Picked up a girlfriend on the way home from Indiana to my home in western Nebraska.
* We also, both picked up SUPAVIRUS from somewhere that was NOT fun, and required one ambulance/hospital trip.
* Friend picked up Covid immediately after flying home to Illinois.
* Lived thru 2 major snow storms.
* Survived 8 days of the first storm, with NO TV, no Wi-fi and sporadic cell phone.  Fortunately I didn't lose power, but I WAS rapidly losing courage!  Perhaps we had 10-12 inches of snow.  
* Started a new quilt during this time named  "-20 Degrees and No WiFi".    It's currently a WIP on my design floor, blocks almost all made.    
* Shoveled  (yes, me, at my age!) 4 separate times during the first storm, temps below zero  and winds that blew it all back.  Obviously, I could not navigate to my usual Wellness Center for needed exercise.
* Replaced a near-dead battery .
* Cancelled my planned Christmas trip to extreme northeast Nebraska due to dangerous cold and snow and numerous road closures into unknown location.  It was a blessing that I had NOT taken that  Christmas trip with a bad battery.  
* Shoveled my walk and sidewalk at least 4 times with second snowfall of 8-10 inches?? , altho a kind "someone" did it several times as well.
* Shoveled my car out twice myself and one time by a kind neighbor with a huge snowblower.  I was sorry I had sold my own snowblower.
* Got stuck only one time in the alley, and was miracously shoveled out within minutes by 2 angels with shovels who suddenly appeared out of nowhere!  8-)))   

The above list of "what did you do all that time?" is pretty boring but I enjoy my own blog posts and might need a reminder!  ...and it's only January.  

Monday, January 04, 2021

Still kickin' at the New Year

I'm still here, working and sewing much of the time.  Hey, this home maintenance being completed by just ONE person takes a lot of time!  My spirits remain sorta OK, and I get lonesome, pretty much like everyone else.  A terrible anniversary is looming -  sad and scary but I will face it.  Time flew by so quickly, it is shocking.  I barely learn what day it is, and it's the next!  

During my blog lull, I have finished the quilting on this QOV, shown as a top previously.   


Love that striped binding!  Here's the back, much of it given to me by quilting friend Tina.

I've  finished this star top (70" x 81") made of a gazillion pieces, but it's together, batting cut to size, no backing yet.  My quilting friend Jody made one and I pestered her for instructions.  The parts are easy to make, but if you copy this one don't make blocks -- it is actually made with rows. It was called Starry something and shown in an old Quilters Newsletter, from a reader in New Zealand. Notice that "stars" are either with dark points, while others are light stars, an invitation to creativity!  The blocks are 3 in. 

My wall paper is down, thanks to help from quilting friend Lari, and purchase of a must-have steamer, definitely the solution to this horrid job.  

Only 2 partial walls had wallpaper, the rest is decent, but removal of wallpaper left expected damage that needs repair before painting.  I have the name of "the man" to call, but he's vacationing somewhere.  This all started with a shopping trip to the carpet store and the owner suggested I get the room painted first, but remove wallpaper before "first".  

Kitchen renovations are still holding, complicated by Covid issues.  My projects continue.  

And a recent pleasure with a million !!! pieces, was a gift from another quilty friend Alice.  This is one tricky challenge.  The finish is of a worn quilt, complete with the damaged binding, hanging on the line.  Too late, it dawned on me that my table will be tied up for a while!

I do not feel like a capable person unless I can have a long list of completed projects.  They were listed here, then I deleted them and began to wonder if I'm demented with my penchant for eternal jobs.  Wonder what a psychiatrist might suggest? 

I wish I had some inkling of what to do with the rest of my life, now as a widow.  There's a big blank road ahead of me and my GPS isn't working.  

Sunday, November 15, 2020

Log Cabin QOV

Investigating into a closet, I found an entire box of red/white/blue fabrics, obviously forgotten.  There was even a book wrapped inside the fabrics.  For me, "out of sight, out of mind"!   (That also works in reverse when shopping!)   But I made this Log Cabin recently.  And I must admit to using that 8 in. Log Cabin Trim Tool, to justify purchasing it years ago, and frankly, I liked it.  Sometimes I get too casual and careless when sewing a simple pattern but using the Trim Tool kept me much neater, more precise.  My border finishes at 1 inch white, 2 inch for red, 3 inch for dark blue.  I use that 1,2,3 calculation a LOT for borders.  

 Stay well and safe, everyone.  

Friday, April 21, 2017

Quilt Show Preps

Next weekend is the wonderful Chadron Festival of Quilts.  These two quilts have not been shown at that show, but have both been on my blog previously.  Today I am filling out paperwork, measuring, etc., and giving them a good airing. 

This "rebuilt" scrappy log cabin is one of my favorites.  I have instructions on my blog, and have made at least 6 so far.  The standard, traditional border was finished and on the quilt but was toooo ordinary.  I laid it out, measured the angle of the tilted blocks and WHACKED OFF the border, using the same angle, then exchanged sides of each of the 4 pieces and sewed them back on, all tilted.  I LOVE it --  that is after my heart started beating again.  Machine quilting is done in a variety of methods, which we are finding very popular these days, although I made this in 2012.  I call it "Step Lively". 
This is another Pineapple, made with 2 different blocks, made in 2016, called "Pineapple Parade".  I really loved making it, and it's similar to one of mine in a different coloration.  This design was inspired from a DVD lesson, by Gyleen Fitzgerald, purchased from Annies Craft Catalog.  


Again, I MQ'ed in a variety of designs, for the simple reason is that I have to keep practicing ALL the ones I've learned.
 Dig that neat backing!

Sunday, September 18, 2016

More on Pinkalicious

I just added the borders - this little donation quilt is really PINK!!!  (Photo is in shade. )

Again, 6 inch finished blocks, I used the log Cabin trim tool to keep the narrow logs from getting too out of control.  The ruler worked very well, I was surprised to learn.

Tuesday, September 13, 2016

Pinkalicious!

Pinkalicious!!!

 Not sewn into rows yet.  

More of Something from Nothing - I DID purchase an inner narrow border fabric and a border.  It's a bit long - I had enough for an extra row, but might not include it.  These are all 6 in. finished blocks and yes, I DID use that fancy-schancy Log Cabin Trim Ruler.  Honestly, I didn't WANT to like it but in the end, the blocks are so neat and tidy, I have to admit the ruler was a help. 

Tuesday, August 16, 2016

Something from Nothing

DONE!

I only meant to clear out a bunch of old strips - none of the strips seemed like they would "go" well together, but sometimes a person has to try new things.  The last logs were the darkest - good plan!  I WAS trying out the Creative Grids 6 inch Log Cabin Trim ruler, feeling positive and smug that it would add nothing to the process but,  uhhhh, I WAS PLEASANTLY SURPRISED with the accurate result!  The original casually-cut leftover strips were anywhere from 2 inches to "sorta" 1 1/4 inches. Narrow strips have a tendency to wobble and stretch during construction and pressing, and the ruler is designed to trim up the logs perfectly after each round.  Logs finish at 3/4 inch. 


The back - it is surprising how homely fabric cut into squares and set into some sort of pattern can make a pretty backing!  I've used this technique frequently, cutting the squares at various sizes, depending on the size of the quilt.  How far back does that red gingham go?

I found it helpful to draw the backing needed onto graph paper to help determine how many of each square was needed.  Save the extras for another quilt backing.

This will be a donation quilt - but I LOVE looking at it for now!

Friday, July 29, 2016

Something from Nothing

I recently purchased Creative Grids 6 inch Log Cabin trimming ruler, wondering if it would tidy-up small log cabins blocks, and help avoid the stretching narrow logs out of shape.  I wanted to clean up left-over strips in a tote and decided to make a small Log Cabin Quilt.  I pulled the blues and turquoises, and the lights, then found a RED in the fabric drawer.  That turquoise just glared back at me, just DARING me to use it, but .....it MIGHT work. Yes, that ruler DID tidy up the logs.  These logs finish at 3/4 inch, the block finishes at 6 inch. 

I had faith ..... 


Not bad!  This might be my new Best Favorite!!!  I call it "Something from Nothing."  It finishes up at 53" x 59".   

Today I am piecing batting bits together, and then will piece backing bits.  Frugal!!! - See Mom, I eventually did learn from you and Grandma!  The entire amount spent will be $0.00. 

Tuesday, April 19, 2016

I just love looking at it!

This is "My Log Cabin in the Forest" .... reminding me of when I lived near Smoky Mountains, and rode my bike thru Cades Cove, loving the trees, hills, vines and leaves, and enjoying views of old cabins, some with falling down fences around them, foliage climbing up and thru the rails.  Do you see the "fence" around the log cabin buildings? 

I was airing it out before taking it to a Quilt Show, and remembered how much I LOVE looking at it over the deck rail.  This quilt is square, about 86" x 86". 

Wednesday, June 18, 2014

Making Ribbons, and a Handsome Log Cabin

Our Quilt Show is approaching in July, and this year a friend (Sharon) and I decided to fussy up the standard ribbons.  We made 22 in all, 11 First, and 11 Second.  We didn't have instructions, and just flew by the seat of our pants.    Between paper piecing the little Pineapple Blocks, making different sized yo-yos, learning benefits or difficulties of including posterboard in the yo-yos, sewing and unsewing, demolishing the "standard" ribbons, adding more to it, knowing where to sew and where to glue, we are pretty near finished!  Oh yes, a hammer was heavily used somewhere along the way!  After two 4-hour meetings, most of them were nearly done.  Here's one, still without it's hanging cord.  We decided we wanted to show it to Guild members at the last meeting, Saturday, so everyone can see them.   I stopped at JoAnns and bought a glue gun - never had one before, but it was definitely useful for this project.  

The pineapple blocks are paper pieced and quilted, with a back as well, and finish at 2.5 inches. There are 2 yo-yos in different sizes, behind the little pineapple quiltlets.  On the back is a white label, for names, etc.  

Is this not a lovely collection ?  The large ribbon was purchased, but we took it apart as well.  

Other than making ribbons, I made this scrappy log cabin (below), and put the blocks on vertical - wow - I LOVE how this vertical setting!!!  Here it is without the border.


(Below)  I added that dark border, because I had used the fabric in the side setting triangles, and LOVE how it make this standard looking quilt into one handsome quilt.  The red on the outside is a dimensional flange, and I will bind it in the same blue - I have enough.  

Right now it is about 52" x 62".  Again, always scraps!  

Happy Quilting!


Wednesday, February 01, 2012

Paper Piecing Little Log Cabins (Version)

P.S. -- Oh great - 2 hours after I posted the below info, I actually DREW the block out, as it had caused me much confusion.  Apparently, sewing the strips in the unorthodox method (no lights or darks) and also sewing them in the opposite direction I usually sewed, threw me into confusion.  End result - the block is correct.  it is ME who is not thinking straight!  (this is the  part about "Pride Goeth before the Fall" -- 2 days ago, I was paid an enormous compliment - I should have been on my guard!) LOLOL
------------------------------------------

Orca Bay is needing one more border on one side.  It's resting on my design floor - yes right in the middle of traffic.  LOL
This is where I'm heading  - this Log Cabin version finishes at 5 inches, and I'm using scraps.  I mentioned to several of my friends that I was looking for "scraps with a lot ot white."  I got them!  Wow!  Donations added about 5 yards to my "Fabric Diet" calculations.  Givers were gleeful to have found a svictim uhhh ... home for their scraps.

First I sorted them by color - that made things a little easier.  Even though the block is not a traditional Log Cabin, I needed some effort at color choice.  I tried to use only 3-4 colors per block.

The magazine with the pattern (Fons and Porter) has been on my shelf for YEARS, wanting to make that little quilt.


Here (above) is where I'm heading.


I discovered that a fussy cutting center didn't add anything positive to the busy overall appearance, so I stopped that. 

But they ARE cute.

If you have read this far, look carefully at my first photo of the single block.  After making 15 blocks, concentrating -- you know how paper piecing is, it's easy to get confused - look how the block is NOT right, and guess what - it is NOT me, it's the pattern!  I was wondering why it felt "odd" as I was sewing it together, but figured because it was being sewn the opposite direction from what I'm used to.  I copied the pattern (100 copies) on the copy machine, straight from the book. 

Other than that, I'm liking it.  The blocks float on a backrground and sashing of white.  
Now, I have to redraw that danged block to figure out what the "right" way is supposed to be.  


Sunday, November 21, 2010

Homemade laundry detergent, and a Star Log Cabin


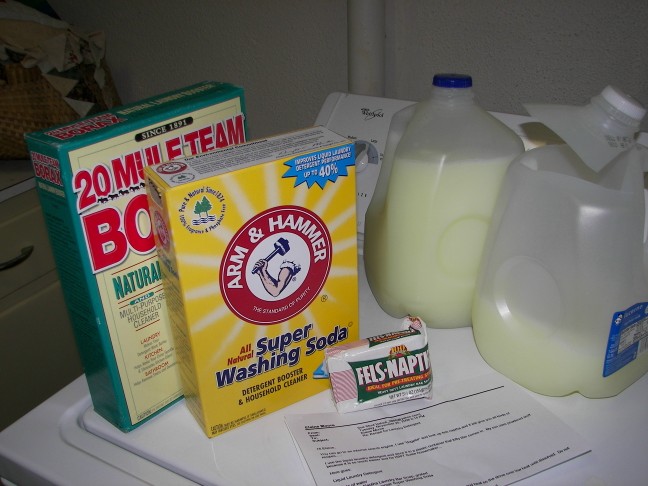
Today I made my 3rd or 4th batch of homemade laundry detergent since December 08. The original cost of ingredients was approx. $10.00. I DID have to purchase a second bar of Fels Naptha for about $2.00, but I STILL have a half box of Washing Soda and half box of 20 Mule Team Boraxo, and 2/3 of that 2nd bar of Fels Naptha. Cost per load is about .01 -- yes, that's right! Also, I don't need fabric softener any more with this detergent - another savings to pocketbook, space and environment. I've not purchased ANY other laundry detergent since 12/08.

There are just the two of us in this household, but I've saved several hundreds of $$ by now, in addition to consideration for the environmental issue. I can only guess at the dollars saved if you have a large family. It takes me about 10-15 minutes to make a batch, I store it in empty milk containers or ice cream buckets - something that can be covered. If interested, check out
www.thefamilyhomestead.com I still purchase stain removal products and occasionally use bleach. YOU DO NOT NEED TO PAY OVER $10.00 PER CONTAINER FOR LAUNDRY DETERGENT. Try it, you might like it!

On a quilty subject - here is a star log cabin WIP to be turned into a Christmas Tree Skirt. While the conventional blocks are easy, I became confused with the scrappy centers, where there was no light/dark differentiation, and I had to admit defeat a time or two and put my seam ripper to good use. More blocks are planned on the outside to make it octagonal, and then it will be surrounded with HSTs (I hope). This is for an artificial tree, 7 1/2 feet tall. How large should I cut the hole? (JoHanna, pretend you haven't seen this!)

Sunday, October 24, 2010

Sandwiching, MQ'ing, last of Fall

What a lovely afternoon - probably the last of our fall season. My back yard is very small, but I LOVE the shadows. Below is the last of our hail-damage issues to be resolved. What a mess this room was for days, but the ceiling has been replaced, walls painted, and mess was cleaned up nicely. EVERYTHING had to be covered, taped with plastic to keep the 'popcorn ceiling' stuff from spreading everywhere.

This outfit on MY DH is HIS version of proper "Retirement" garb. Being properly dressed is no longer for him - I will see this on him all winter. Groannnn! I'm getting ready to sandwich a quilt in the garage.
Helen in the UK, posted photos of HER Mq'ing that she learned from the Pajama Quilter. I watched that segment 6 times today, and think I've got it! Here is my practice sandwich.
I'll call this my "Homely Quilt" for now - it's another Rebuilt Log Cabin done entirely with all the junky strips in the drawer. I tried out a different, totally unrelated border. But it's ready for machine quilting and I'm thinking that when completed, it will prove that "Quilting Makes the Quilt!"

Monday, August 16, 2010

Graphing the border

I am pushing the limits with this version of Log Cabin. Wow - talk about busy! Some of my fabrics are Kaffe Fassett, which I've wanted to try, but I'm ending up with a very strong quilt. Not sure I like it but no matter what quilt I'm making, I tend not to like it until it's done so ... here's to "getting it done!"

Since the quilt center is so strong, I thought the border needed to be equally strong. I chose this Bargello-type design. This design is very effective when you want to use up your fabric used in the quilt, when you want the design to wrap around the quilt, when you want your corners to be kinda clever. Only one of the fabrics needs to be repeated -- all the rest CAN be softer left-overs. I chose the brown to be the "marker." My pattern remains constant in this case.

Get our your graph paper! You MUST start at one end - leave the corner block undone for now - and work towards the center. No matter what side you are working on, work from the edge of the quilt towards the center, and modify in the center.


While this looks complicated, it is NOT, but you MUST plan it on graph paper. The strip widths are sewn together in a strata, pressed every other way, then the edges are sewn together and you have a tube. Then they are cut apart (these are cut at 2 inches), then carefully unsewn one at a time, so the pattern is repeated the way it is designed. A few mistakes were made, but altogether, it's strong enough to stand next to the busy Kaffe Fassett fabric. I'll show the whole project when completed.

You might be able to see my Flower Pin marking the last strip made, and there is an arrow marking the center in my graph plan. It's easy to get mixed up, but again, the sewing is NOT difficult - it's so darned neat! Your design on one side of the corner block may be different on the other side of the corner block. Keep your graph paper in front of you. Now it's time for me to start at the other end of that border.

(Note to myself - Elaine Adair, you dorky non-mathematician quilter! You drew your graph plans to one inch, but your squares finish to 1.5 inches! I'm glad I realized it now instead of at 3:00 am! The 'idea' is still accurate -- my own calculations are not!)

Sunday, September 24, 2006

"Water Logged Cabin"


Another scrappy quilt - I pulled most of the fabric from my stash - I made this some time ago. This is made similar to the previous Rebuilt Log Cabin, where the blocks are made oversize, then the corners are trimmed off and resewn to opposite sides. Doesn’t that technique give even more life to a Log Cabin? I had many scraps of purples, blues, greens, and I was aiming for an ocean-looking quilt. I asked the machine quilter for a swirly, kelp-like, frond-y pattern. She did a fantastic job!

I went one step farther, and beaded the corners with small blue and purple glass bubbley beads. The beading is minimal because I had visions of actually USING this double bed sized quilt.

The full size photo was taken at a quilt show – it shows off the bargello-based border that I adapted from the bargello techniques and samples adapted from Bonnie at www.quiltville.com What a versatile block.

I am sometimes a hand quilter, and sometimes a machine quilter, on my home machine. I’m not so great at machine quilting, but I keep practicing and am getting better. I've even experienced some moments of absolutely lovely machine quilting! Here’s also a closeup of the wonderful machine quilting done by a long-arm machine quilting friend.