Showing posts with label ruler work. Show all posts

Tuesday, April 14, 2020

Newish techniques, old favorite things

Garlic Knots - I'm practicing ruler work in the border - tedious, but kinda cool as well.  I lost my way, here and there.  Seams under the ruler sometimes helped, sometimes hindered.  I need to improve on sharper corners, and I also wish I had left more extra batting and backing on the outside of the border, to grip.  Two more sides to do, then just binding and it will be D O N E!  

I added a strip of sandpaper to the back of my ruler.   It might not be needed by others but helped me hold onto the fabric.  No technique is perfect - I had to make other adjustments when using this ruler, such as changing the large screw on the foot, to a smaller screw which allowed the ruler to slide under.  Also, it's still difficult to use this ruler behind the foot but must change to a  thinner ruler,  or else modify my approach to the quilting.  All do-able.  Live and learn.


I found this treasure among DH's stuff -- almost 100 years old.  

The pictures are kinda Amish in nature - something about being neat and tidy, use each day to the fullest, etc.  The beer box holds CDs, and the current one is called Ansel Adams - a very calming  instrumental.  The pencil sharpener?  Occasionally the top of the player needs some "weight" to play the CDs.  Yep, that's my technology solution - better than a brick! 


Wow, those white walls are glaring!  I need more stuff on the walls.  No curtain fabric has arrived yet. 

Friday, April 12, 2019

"Scraps Rule"

(I MQ on a DSM).  This is the 3rd, finished project from the gifted, never ending box of scraps.  Projects 4, 5, and 6, are in process!!!  

DONE - I used my "stuck-in-the-house" time well (2 blizzards), finishing up this quilt, called "Scraps Rule".  I used rulers on the lights and free-motion quilting on the dark.  Opinion on ruler work ... ??? this is new to me, and it did slow my progress considerably, altho I got faster.  I bought one thick ruler just for this project, but used a traditional 2.5 x 6 in. ruler for the most part.  The MQ foot that I use glides, does not hop, so my traditional quilting ruler (thin) worked well.  I actually broke my expensive MQ ruler somehow, didn't break the needle, just the ruler!  ARGH !  I glued it back together and still wonder how it happened.  The machine quilting foot apparatus somehow came into contact with that thick ruler and WHAM BAM!!! so I'm guessing I put the thick ruler in the wrong place at the wrong time.  

The large triangles are 60 degrees, and the smaller triangles are made with the Tri-Recs ruler.  The quilt measures approx. 70" x 80".

The finished product is visually pleasing, altho my ruler work leaves much to be desired - no quilt show winner here, yet I consider it's completion an accomplishment, considering the lengthy practicing, rethreading, unsewing, sighs of frustration.  I also learned my machine does NOT like to sew in a backward direction when machine quilting.

Here's the back, again making use of stash fabric.  It's "almost" perfectly square. 

This was inspired by Quiltville.com, a free pattern, altho I always end up going in my own direction, once I get "the bug".  Thank you Bonnie Hunter for her fabulous, never-ending ideas. 

Tip on making a backing like this.  I used MSWord to make a graph with the required visual dimensions, then print it out, color in what squares I have to verify I have enuf of each value.  It's worthwhile to consider half squares around the borders. Of course you can just lay them out where they fall but I wanted a defined pattern.  Alternating lights and darks would also be cool, or a kind of Trip Around the World or .... and remember you can piece those backing squares as well, or use leftover blocks or ...

Saturday, March 16, 2019

Blizzard over, time for quilting!

These photos are for my own journey - everyone else in this part of the country has similar photos.  It's been a doozey but thankfully no downed lines, no outages, and temps remained tolerable.  I couldn't get off the deck or anywhere else to take better photos - waaay too much snow, but we all agreed, we were fortunate.  Conditions were NOT fortunate toward the other (eastern) end of the state, where  sadly, floods caused terrible damage.  

Quilting photos are at the end of this post.  

 There is a garden gnome under that 4 ft. drift.  
 My neighbors back door, with a huge drift OVER the fence and right against her back door!
Huge drift (can't even see).  Getting into garage is impossible for now.   Homes are close together - finding somewhere to put snow is an issue.  

To self -- Remember to send a Thank You to the Bulldozer angel who wouldn't accept pay for clearing out the back driveway, and another Thank You to the family who cleared off the snow several days earlier, from the previous snow.  We have wonderful friends and neighbors, even if we don't know them.  
--------------------------------------

OK, Quilt-y stuff now.  I am working on a light/dark zig zag, 60 degree  triangle quilt  inspired  by Bonnie Hunter (free pattern on her site).  This is one of 5 projects, made from the box of scraps given to me.  I am proud of ME for using the gift.  And there is still more left over - perhaps a 6th project?  

Here is how I'm quilting the sides and the light triangles.  The lights are ruler work, the darks are more traditional (free-form) quilting.  It's taking a LONG time, even with this minimal quilting.
 Below - a proper ruler (left one) for Machine Quilting on a DSM, and my standard quilting ruler.  Since my quilting foot does not hop, and because of some interference with machine hardware, the slimmer  "wrong" ruler works well, while the "proper" ruler is less used.  I also replaced the larger, easier to handle screw that holds the foot on.  The replacement is very small, making ruler usage visually easier but I'd better not drop it while screwing that tiny thing in place.  

Below - The mess under the needle.  I have 3-4 rows MQ'ed.  Slow going with that ruler work, but I'm still a beginner. I've succumbed to frequent unstitching.  Solution seems to be where I position the ruler - on the seam or off the seam.  

Triangles seem to invite these wedge lines.  I am drawing the lines with a Frixion pen. They come out with the iron.  Seems like double work to draw them, then use the ruler to stitch them.  Stitching them without the ruler ALMOST produces the same line.  mmmm gotta work on that.  

Monday, February 25, 2019

BASTING and puckers and pleats, OH MY. Pineapple project will calm my soul!

Basting a quilt top is my least favorite job.  I dragged one table from the garage to the house, across the snow -- it's heavier than I remember.  My top and backing are pressed nicely, batting was in the dryer with a damp towel, all is ready for the job.  This time I decided to use basting spray AND pins.  I did everything else just the same as previous jobs but for some reason, by the time I reached the bottom of the quilt, my carefully measured backing is no longer long enough - uh oh, how can that be?? 

Well, when I thought I was finished but short, I took it off the table and turned it over, oh my gosh, not just a few puckers, but now I had pleats!  Careless, ??? not concentrating ????  Disaster!  The top and batting are all OK (flat), sooooo, gathering my patience, taking a deep breath,  I removed all the pins  from the front, laid the mess backing/puckered side up on the table and pulled off the well-stuck basting spray, a little at a time, starting at the top and slowly smooshing out the puckers.  A yardstick stuck between layers helped to unstick a few inches at a time - laborious! Then I found my long needle and thread and thimble, and hand basted it all over again.  No wonder my backing seemed short, I had INCHES of fabric puckered in the back.  LIVE AND LEARN.  Never again will I use both basting spray and pins.  It didn't help when my last thimble dropped to the floor and rolled somewhere under DH's Lazy Boy and found it's forever home wedged within the under structure of the chair.

Ok, basting is done by hand sewing and this was successful.  Here's the back - you see I had already spent a lot of effort making the backing.  Hey, that's 6 yards of stash!

I am hoping to try some ruler work on this Bonnie Hunter inspiration.  BTW, this top front was made from the same "gift of scraps" from my LQS.  There are 5 projects made from that box. 

And here is another project from that box of scraps.  8-)))   I may make an alternate block, ala Hugs and Kisses, Gyleen X. Fitzgerald.  16 regular pineapple blocks made today.  I added the white fabric. 

Tuesday, October 10, 2017

"Prolific Pyramids" - a finish

This may be called "Thousand Pyramids" but 1000 is too many this time.  All from my stash, except the backing.  I practiced "ruler work" on this one and was marginally pleased with what I did.  The end result is much better than I expected.  These triangles/pyramids are using the triangle from Tri-Recs, a little more graceful than the 60 degree equilateral triangle.  I called it "Prolific" because every time I turned around, another triangle was needed, and then those baby ones started showing up!

I was surprised with how easy this was and how many different ways the triangles could be set together, resulting in a myriad of variations.  I grouped 4 light and 4 dark triangles in each unit, and always had the darks on the same side each time.  I pressed seams open and again was pleased with the ease of sewing them, with reasonable care, as 2 sides were on bias. 

DH was holding this up and sun was shining thru.  It's all quilted and DONE.  

 Lots of straight lines, lots of practice with rulers!  I reverted back to free-form quilting in the side triangles. 
 Backing - isn't it delightful?  ... giraffes, with little blue baby giraffes. 

Sunday, August 20, 2017

Anniversary, and Ruler Work Practice

Our anniversary is same as Eclipse Day - flowers arrived early, because of all the activity planned tomorrow, big "E" day.  Our little town of 8900 is in the center of the pathway and good grief, so much planned, so many people expected, so many flights in and out and even rumors of a few big name "movie stars"!  We are not accustomed to "traffic" but already 1 day prior to the big "E" day, ... hey, it's a ZOO  out there!  
New subject -- I've been practicing ruler work - this quilt begged for straight lines.  

Originally I tried this ruler made especially for what I thought would be useful - mmmm - not sure it works well for this project, but perhaps on another design.  More practice me thinks! For this project, the straight edge is not long enough before hitting a stop point.  Re-adjusting the ruler each time means delays, and more possibility of a mis-stitch.  

Below is one of my quilting feet - notice the high edge around the foot, meant to keep a ruler  from sliding getting under the needle, but also it slides along the edge of the ruler, keeping the line straight.  However, note on the right of my foot, how the assembly is rubbing slightly against the ruler - it does not actually impede movement but it 's close and something to think about, if choosing a ruler.  Also, there is a lot of "stuff" in my view, hard to see behind the foot, but it can be done.  I did a lot of peeking, up, down, leaning left and right to be sure my ruler was lined up accurately. 
 I found this short, ruler in my stash, a freebee when visiting this Denver shop - it works great!  It is thin so be sure your ruler foot had high edges.  You need a little ruler that slides around easily, doesn't get caught up on seams, but slides over them but also stays put.  Tricky?  Yep! 
Some of my lines - turning corners and then readjusting was difficult without little crooked stitches.  I did used a dark Sharpie to fix some of my mis-stitches on dark fabrics as my thread showed light.  Thread buildup was my problem at the center of the triangles, but then I learned how to stop short before going back the other way and then I learned Jump Stitches when moving from one area to the next.  My first 2 or 3 blocks had to be redone several times -- practice helps a LOT.  
I marked everything, using a Frixion pen in purple along with a white ceramic pencil.  This is not a fast project for now but gets faster with practice.  Perhaps, in time,  I won't need to mark each block. 

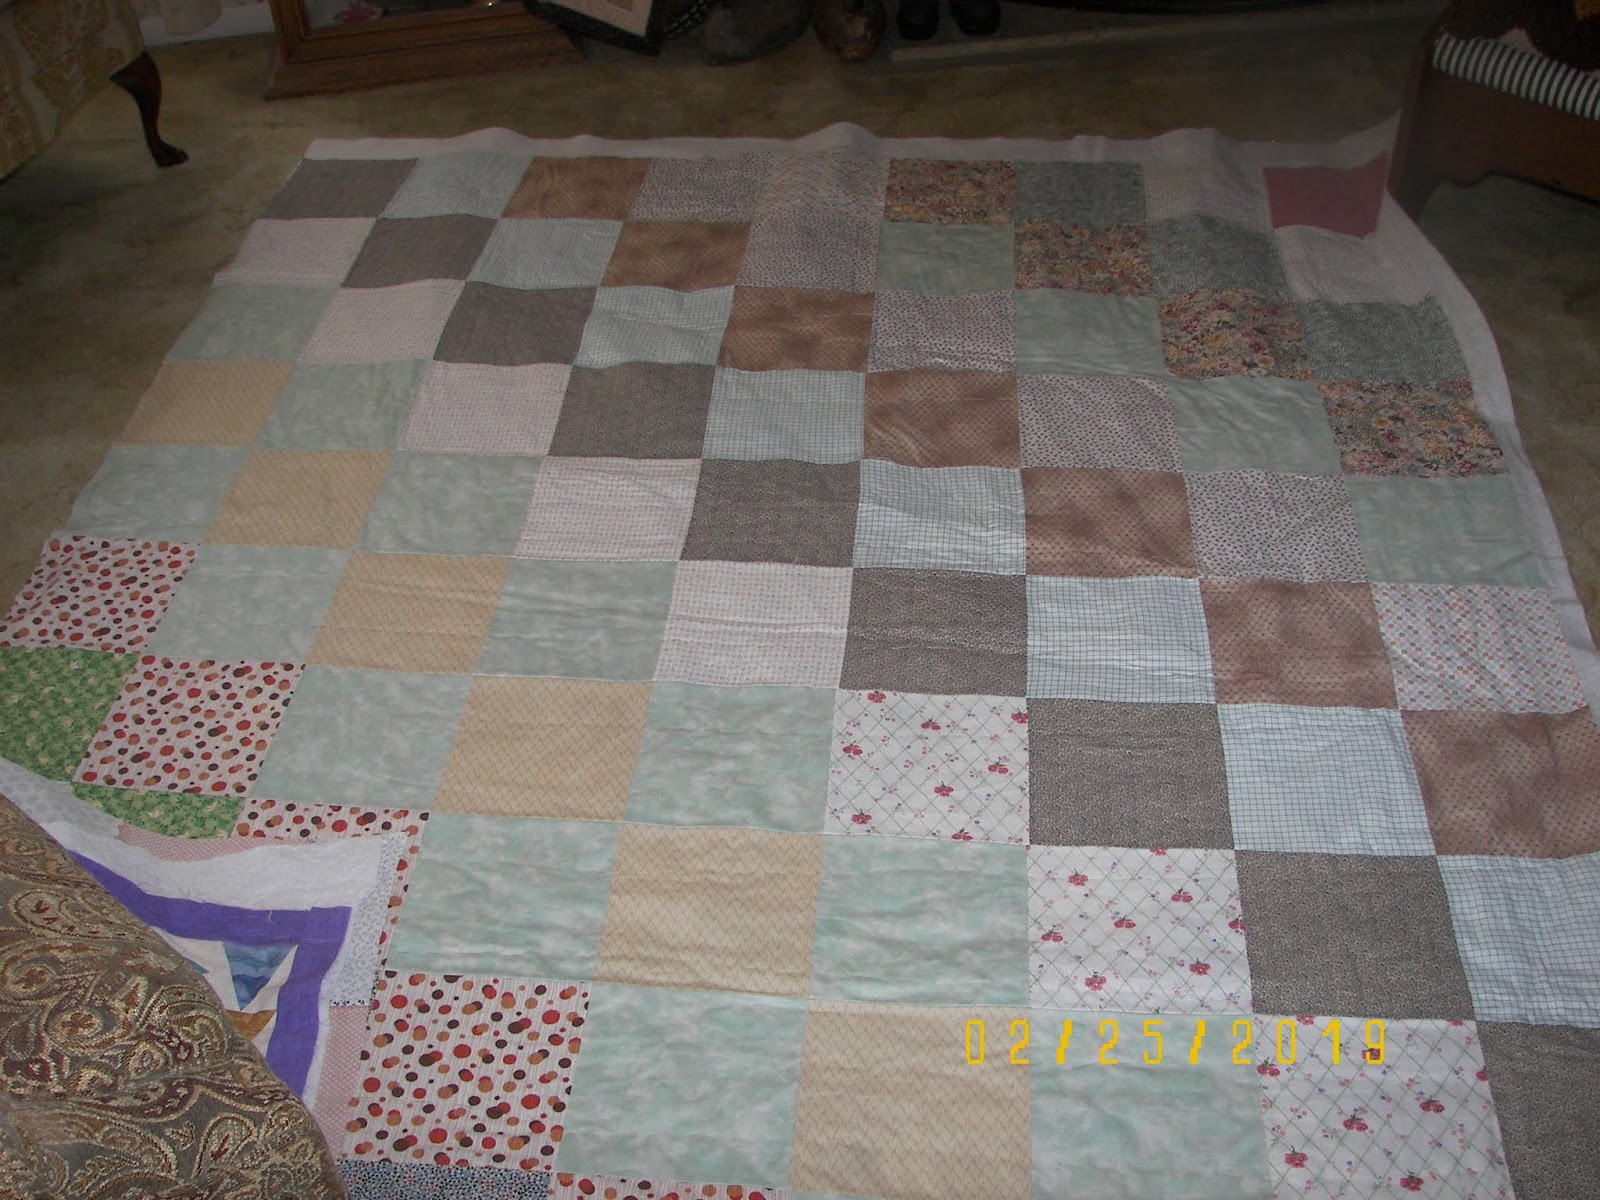
DH and I both agreed we are liking the overall effect.  This is before sandwiching.