Saturday, December 31, 2016

More, More Farm Girl Blocks, and Blizzard

Yep, still more blocks for Farm Girl Vintage - I am getting close to the suggested 48!  The whole point to this lovely project was to make a quilt that took "a long time".  I'm trying to appreciate "slow progress". 

In the meantime, here is outside our front door, Christmas Day.  I just HAD to get out of the house.  Blizzard warnings and whiteout conditions kept most folks indoors.  The fresh air felt wonderful, but in a matter of minutes, my cheeks were feeling frostbit -- wind was terrible.  I walked only half a block one way then was sorry and came back inside!  Dh decided I had lost my mind.      
 A big "thank you" to the unknown folks who cleared off the sidewalk , the first time - they are so bundled up that we hadn't a clue!  By morning, the sidewalks needed it again, and "someone else"  cleared them.


Happy New Year everyone!!!


Sunday, December 18, 2016

More "Farm Girl Vintage" Blocks

I decided to make "blocks that take some time" - not just speed quilting, because my closets are full of quilts already ! 

These are all 6 inch blocks.  Some are "fiddly", but I still like them. Definitely NOT speed anything!  This is the first time I actually sat and followed all instructions.  Colors are my own choice.   Instructions are also included for 12 inch blocks, as well as various varieties of other quilts, ideas, layouts, designs in this beautiful farm-based quilting book by Lori Holt . Even if you didn't sew or quilt, her book is a visual delight!

28 blocks made - 48 needed.


Sunday, December 11, 2016

Learning Humility


This was our  BOM (block of the month) for November Guild meeting, over a month ago.  Despite it being "easy",  and I have been quilting for over 35 years, and feeling a little bit "overqualified" at having to make such an "easy" 12 inch block,  it took me 4 tries to get it right!  Some of the problems were fabric selection, but others were simply putting the right pieces in the right places.  Good Grief! Where were my brains?


Finally, after the 4th try, it was done and correct !  I was so relieved to be DONE with it and snapped a photo for my blog, then happily turned it into the BOM at Guild, where a former sailing friend won them all - I was so pleased!  Today, a month later, I looked at it on my photos and ... OMGOSH!!!  Do you see the stupid error, AGAIN!!!  Yes, all the white sails are upside down.

Where were my brains on such an easy block????  My husband will never let up teasing me!  LOL  I had even proudly ( !! ) attached a return address sticker on the back.   
 
Every time when I think I’m doing pretty good with life and I’m busy patting myself on the back, my Creator reminds me not to get too uppity!  8-)) 


Wishing you all lovely Holidays and a Happy New Year,

Elaine Adair

Monday, November 07, 2016

Farm Girl Vintage, Three More Blocks

Farm Girl Vintage, by Lori Holt - despite the large number of pieces, they all are turning out well.  I used my revolving mat to trim off the bits and slivers from on the edges.  All have ended up to size of 6.5 raw.

That stinker on lower right has 49 pieces!  There is also a clever "trick" in that block.  Contrast is better with batting behind them - dark table doesn't show how fresh they are!  Most of the fabrics in my collection for this project are soft greens and pinks and a few yellows.  I added the turquoise to brighten it a bit, and will include the color in several blocks.

The instructions include directions for  6 inch, and 12 inch blocks, but it would not be difficult to graph many into a 9 inch block as well.   I made a few in 12 inch and decided (IMH) "waaaay too large".  


Onward and upward - steeling myself for the dreaded Voting day tomorrow ... 8-(((   This is Monday, third day of headache and I know why. 


Sunday, October 30, 2016

Vintage blocks, and Chickens with a sense of value

We get eggs from "the farm"  -- there were so pretty, and almost organized by value that I had to get a photo!  Weird? yep!  sometimes there are blue or green ones included.  8-)) 


Since I had the good fortune to grow up on a farm, I HAD to buy this book and a bunch of appropriate FQs to go along with the vintage "flavor."  There is a wide variety of quilt designs included, made from these blocks and it's spiral-bound !  Blocks shown are in either 6 or 12 in. sizes.  Mix and match or choose what you like.  The book is a delight all by itself.  So far my blocks are all 6 inches finished - a bit tedious -  but I wanted a project that took some time, instead of speed producing!  Also, instead of iron pressing each step along the way, I mostly finger pressed, and was pleased with the result.  Instructions are clear and easy to understand, but not much chain piecing!  The book and fabric are from an amazing shop half way between Delafield and Milwaukee, Wisconsin, along the Interstate - can't remember the name, when I visited family about 18 months ago.  

This is another beautiful book by Lori Holt, of http://beeinmybonnetco.blogspot.com/ Her style is fresh and bright and inviting. 


Friday, October 21, 2016

"Pinkalicious"

"Pinkalicious".   (I always name my quilts - this one was easy!)  I pulled all my bits of pink, some with little girly motifs.  Some little girl will love it!  I DID purchase the border fabric, which is all very small overlapping boxes, so I machine quilted overlapping boxes, something I've always wanted to try.  My boxes don't follow the fabric motifs, but they turned out well, and very textured.  I used the round plastic guilting foot - a great help.  At the very end of the  border quilting job, I quilted one giant swirl, in the border,  just to be obstinate! 

Dig that cute backing!  I DID purchase that especially for this little quilt.

Sunday, October 16, 2016

"Pineapple Parade" - DONE

Yeah - It turned out DONE and good!   If you have not made one, I would encourage you to try.  Design possibilities are endless - note that there are 2 blocks in this design, making that "spool-like corner" and dark center in the same block, and the other block is traditional, and mine is scrappy.  The block corners are where much of the design ends up.  Get a good ruler and a good design and go for it.  No paper is needed for this 8 inch size, no drawing on muslin, ... those are other options.  My Pineapple DVD with several patterns was found in Annies Craft Catalog and designer is Gyleen Fitzgerald.  You will LOVE the DVD, (currently $14.99!) even if you don't make the quilt.  (There is another DVD option for the same quilt, but higher cost - not sure what that is.  I learned from the DVD and instructions on the DVD, and did not "join" the on-line class, another option.)  I DID purchase the ruler she recommended but others are available.   Again, she has a simple ruler, but Annies has a more complex ruler that that did not appeal to me.


My geraniums this year - almost all of my gardening is right here!  The foliage was so dense, and the leaves were thick and triangular - very pretty when weather was good.  Here, they have had one frost and one heavy wet snow, but they did survive under a blanket.  See all those green/yellow crawling ivy trailing things? I forgot what they are called,  but this year they survived the winter and returned.  8-)))

Now, I am off to sew on a project that is going to take a long time - my house is overflowing with quilts that get turned out every month, and there is NO room!  Yesterday I delivered 2 Linus quilts so there is a little bit of space again!  Happy quilting!

Wednesday, October 12, 2016

Tried something new and it worked!

I generally, don't "do" stippling, but I tried this foot to help keep the curves more uniform, and surprise - it worked very well for this area.  This is the corner treatment for "Pineapple Parade". 

The foot is one of 3 for quilting that came in one Janome package, and is round clear plastic, with several guides on it, for various size circles or lines or ... stipples.  This corner needed larger curves. 

That worked pretty well, so I tried something new in this  outermost border on "Pineapple Parade".    (The batting is not trimmed yet.)  You can see the foot on this photo.  BTW, this foot does NOT hop.  It took me some time to learn how to use it, but in the end, it does the job.    


Today I'm sewing on the binding - my favorite part.  8-)))   This quilt is about 70" x 90". 

Sunday, October 09, 2016

"Pineapple Parade"

LOL - I just love that name, especially for this Pineapple quilt, which is a little bold, ostentatious, bright in some places and marching all in the right directions, many colors, all marching at the same rhythm!  PERFECT name.  (I had to check the dictionary for the right "P" word to go with "Pineapple".)  This is the second Pineapple I've done in last few months - I LOVE this technique, not difficult at all with a decent ruler.  Mine is from Gyleen X. Fitzgerald, who I "found" when I purchased a DVD from Annie's Craft Catalog.  Lucky me!

Above, that far right are Sally Terry  style feathers.  In this case, they are too cramped, but usually I like them.  There are 3 borders, each one slightly wider to accommodate a corner treatment (not shown) 

Hearts are always good, aka "xxx ladies on a barstool"!  Third border, finally decided on today, is a Baptist Fan.  I am struggling to learn to incorporate 3 borders that seem to blend together, yet stand out, not too big, not too little and still be in keeping with style of quilt and one that I know how to do!  Not so easy!


Above is just to show the bold backing.

I quilted the quilt top with a King Tut quality thread, with a fine Mettler Silk Finish on the back - this usually works together for me, but in the borders, the same King Tut was not the best and I finally took out several first tries, then changed to Essential Pro which sews like butta!  This combo works very well together for me, and the Essential Pro is fine and blends in so well.  One sees the texture not the thread.  I need to remember this!

I am nearly finished - wanted to show it.  


Thursday, September 29, 2016

A Garden Addition

This  gnome, aka "Little Bit",  moved into our garden recently - about my birthday time.  We moved him temporarily to the deck so we could see the lantern (solar) at night. He's about 17 inches tall. 

Sunday, September 18, 2016

More on Pinkalicious

I just added the borders - this little donation quilt is really PINK!!!  (Photo is in shade. )

Again, 6 inch finished blocks, I used the log Cabin trim tool to keep the narrow logs from getting too out of control.  The ruler worked very well, I was surprised to learn.

Tuesday, September 13, 2016

Pinkalicious!

Pinkalicious!!!

 Not sewn into rows yet.  

More of Something from Nothing - I DID purchase an inner narrow border fabric and a border.  It's a bit long - I had enough for an extra row, but might not include it.  These are all 6 in. finished blocks and yes, I DID use that fancy-schancy Log Cabin Trim Ruler.  Honestly, I didn't WANT to like it but in the end, the blocks are so neat and tidy, I have to admit the ruler was a help. 

Monday, September 05, 2016

Another Spider Web, different approach


My blocks are together, as are a few rows.  My goal this time was to learn how to "complete" each web before the border starts .  No chopped off webs!  I'll probably make a narrow border, then a wider one.   Backgrounds are also scrappy.  This started a few weeks ago, with a real in-person meeting with Karla Alexander (many quilt books!).  Her pattern is called "Tango" - done in blues.  I wish I had used blues, since I'd already had made a spider web with earth colors.  Oh well!  This is one of those "can't see the forest for the trees" syndromes - I just was so intent on the newer method, I totally forgot choices of colors.  LOL

Again, here is how it goes together - not like you might expect.  See the diagonal seam line across the block?  2 of them fit together to make the square block. 
 

Here is my previous finished quilt - I like it but don't like how the webs kinda just stop where they meet the borders.  Soooo, now I have two!  Good grief. 

Wednesday, August 31, 2016

More on Frixion Pens, and DONE with "Heinz 57"


Hand quilted!!!  D O N E!

My last post included info on using the hair dryer to whoosh all the Frixion lines away.  I misspoke  - many of the lines reappeared later, where I had used the hair dryer.  Oh dear, PANIC time, but then I followed directions (!!!) and used my iron.  I had resisted the iron because my blocks had been marked with the traditional  blue pen - you know, the ones where you absolutely CANNOT use iron on them -  and I was afraid of some possible error.  I used the Frixion only on the border gridwork, and they disappeared with the iron.  Whew!

This quilt is called "Heinz 57."  It's 74" x 84".   There are 49 blocks in the top and 8 leftover (equal 57 varieties) that I'll put on the back - kinda late in the plan but .....  The blocks were made about years ago, and I remember the absolute delight making them - using 1.5 inch and  2.5 inch  leftover pieces.  The blocks are each different.  Each one was put together little regard for "matching" other than light and dark placement, and I LOVE how even "mismatched" blocks look great and present new color combinations, previously not considered.  The dark green border on each block gives continuity.  I'm remembering I could not stop making those cute blocks!!!! 

I did not continue the grid quilting to the edge.  It seemed 4 lines was enough.  This is a country-like quilt, all hand quilted.  I have a small hole in the back to repair, and another on the top, where seams pulled apart.  (Check those seams, Elaine!! before basting it).

Finally, thank you Ms. Victoria, of Park Hill Farm blog, for helping me figure out to make "My Blog List" on my page.  I will add more.   


Wednesday, August 24, 2016

Frixion Pen, and New Spider Web


I am hand quilting, have worked out to a wide border that has side setting triangles.  The fabric in the side setting triangles and also in the border (soft green and white stripes) are the same fabric.  I'm doing a lot of grid quilting that must be marked,  and decided to try the Frixion pen.  Of course I was afraid but ... the lines totally disappear with heat.  Instead of using the iron for heat, I threw the quilt-in-process over the bed, and  used the hair dryer.  OMgoodness, those lines disappear like magic.  The pen tip is just like a slender ball point pen.  It's made by Pilot.  I wrapped a big bulky rubber band around it to be sure it was not used for anything else.  I'm very pleased.

If you have not done grid quilting (hand or machine), by all means ... plan ahead.  When there are multiple places where you plan the grid, remember that it all has to be equidistant or creatively altered.  I realized my 1 inch lines would NOT be perfect as it went from one space to the next, so some different ideas had to used - not brainy, just thought out.   DH helped.  8-)))
=============


And here is new project, based on Karla Alexander's system, a spider web.   She advertises the Creative Grids Rulers.  This video is also on YouTube.  She does a nice "ending" to her spider web, so they aren't just "cut off" at the borders, and that is what I learned at a recent trunk show she held at Pat's Creative Stitchery.  Below is one block.  4 are needed for a completed spider web.  

I've made this design before, but this is a different approach.  Below are the "kites".  When blocks are together, the "kites" provide their own design.   Karla has written a number of quilt books.  Her "thing" is sliced, slid, shuffled strips.  
Below are 4 unpressed strata, to be cut into wedges.  Each set of "Strata" is made of 5 of the same strips, but in a shuffled order.  There are 7 wedges in each strata, meaning that there is some mixing of the wedges to make 8 as needed for a "web".

And .... wonder of wonder ...these are NOT scraps, I bought  these FQs specifically for a "special" project, like this one.

Friday, August 19, 2016

An Original Anniversary Gift

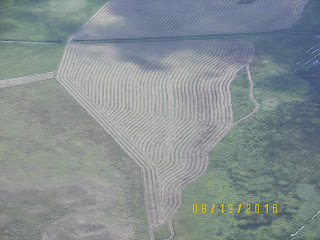
DH surprised me with this unique Anniversary Gift.  He planned a 2 hr. plane excursion this morning over these lovely Sandhills.  I live in a town of 8900, far out in the boonies, western Nebraska , and I wanted to show YOU how open and wide the spaces are, outside of town.  Photos were quickly shot from the plane  - you won't recognize anything but they DO show you the landscape.  It was a lovely gift - something we'll both remember for many years. Our plane was a 1976 Cessna Sky Hawk, piloted by a talented and knowledgeable pilot.    

Below - east of town, there is a LOT of space.
 Below - see the dot?  Our shadow. 8-))
 OK, I'm a quilter -  was inspired by the lines! 
Despite being a dry climate, there are many small lakes in the Sandhills.  Most are not good water. 
 I think this was Crescent Lake Recreational Center - a waterfowl sanctuary. We saw a lot of white pelicans.

Below - one pivot, this  crop looks like corn. Some of the dark blotches in the back are lakes, others are cloud shadows. 


Below - 6 pivots all together.  There is a car or truck on the road, that little dark splotch before the "Y" on the road.  A pivot is an irrigation system, with a well in the center and a huge spraying contraptions that move in circles, irrigating the various crops.  These might be corn.  
 We had lightning and an unusual heavy rain last night, and saw 3-4 blackened areas that had been struck by lightning, burned, and apparently distinquished by the unexpected rain (no photo).  Signs on highways are remind motorists to beware of range fires, a serious danger in dry seasons.  

The "Sandhills" cover large areas east of my home.  Fields appear pockparked with humps and hills, many sprinkled with cattle, deer, some antelope.  From the air, we can see huge farms and ranches, waaaay off from main roads.   Large amounts of land is necessary for cattle. Farms/ranches of 100,000 acres is not unusual.

Below is my town, Alliance.  
75% of this town's economy, is related to railroads.  I counted 25 parked trains as we flew over, currently parked due to EPA restrictions on coal emissions.  The trains carry coal, from Wyoming.  A fully loaded train will be 130 cars long.  At times I've wondered if there is anything left of Wyoming, due to the many trains full of coal that pass thru this area.

Below - DH and I, two old fogies living in the fast lane - our 18th anniversary!   A very good day!

Tuesday, August 16, 2016

Something from Nothing

DONE!

I only meant to clear out a bunch of old strips - none of the strips seemed like they would "go" well together, but sometimes a person has to try new things.  The last logs were the darkest - good plan!  I WAS trying out the Creative Grids 6 inch Log Cabin Trim ruler, feeling positive and smug that it would add nothing to the process but,  uhhhh, I WAS PLEASANTLY SURPRISED with the accurate result!  The original casually-cut leftover strips were anywhere from 2 inches to "sorta" 1 1/4 inches. Narrow strips have a tendency to wobble and stretch during construction and pressing, and the ruler is designed to trim up the logs perfectly after each round.  Logs finish at 3/4 inch. 


The back - it is surprising how homely fabric cut into squares and set into some sort of pattern can make a pretty backing!  I've used this technique frequently, cutting the squares at various sizes, depending on the size of the quilt.  How far back does that red gingham go?

I found it helpful to draw the backing needed onto graph paper to help determine how many of each square was needed.  Save the extras for another quilt backing.

This will be a donation quilt - but I LOVE looking at it for now!

Sunday, July 31, 2016

Backing squares, using Stash, and ... Pageviews from Russia???

I'm planning  the backing for a recent log cabin quilt destined as a donation.  I'll use 8 inch squares of "stash" for this one, but want a certain plan, not just squares in haphazard layout.  This quilt needed a layout of 8 blocks x 9 blocks.  From experience, it's easier for me to draw something out on graph paper, count what I have available, make a few more, then lay the squares out on the floor - less getting up and down. 

Here is how it looks laid out.  I then stack them up, put them together in order, and clip the top left corner of the stack.  I always use top left to "mark" the corner - once you start sewing them, they get out of order all by themselves!  8-)

One more thing, all the squares are laid out in the same direction, i.e., all lengthwise grain or all crosswise, and I don't mix them up. I forgot that detail one time, and was sorry.  When all quilted it will be lovely! 


New subject:  Why do I get so many "pageviews" on my blog from Russia - I'm talking about 5-600  a day?  Are they all spam or nefarious virus efforts ?  Have you looked at your own blogs to see where the pageviews are from? 

Friday, July 29, 2016

Something from Nothing

I recently purchased Creative Grids 6 inch Log Cabin trimming ruler, wondering if it would tidy-up small log cabins blocks, and help avoid the stretching narrow logs out of shape.  I wanted to clean up left-over strips in a tote and decided to make a small Log Cabin Quilt.  I pulled the blues and turquoises, and the lights, then found a RED in the fabric drawer.  That turquoise just glared back at me, just DARING me to use it, but .....it MIGHT work. Yes, that ruler DID tidy up the logs.  These logs finish at 3/4 inch, the block finishes at 6 inch. 

I had faith ..... 


Not bad!  This might be my new Best Favorite!!!  I call it "Something from Nothing."  It finishes up at 53" x 59".   
Today I am piecing batting bits together, and then will piece backing bits.  Frugal!!! - See Mom, I eventually did learn from you and Grandma!  The entire amount spent will be $0.00.